Voeg de Verarca App toe aan Business Central
Stap 1: Log in op Business Central
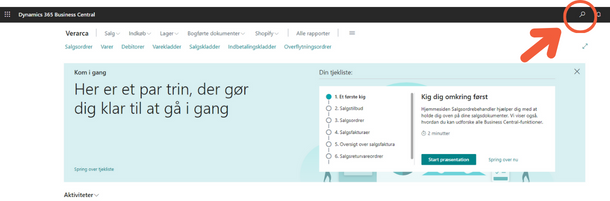
Stap 2: Klik op de zoekknop rechtsboven op de pagina
Stap 3: Typ “aad” in het zoekveld dat verschijnt. Klik daarna op “Microsoft Entra Applications”
.png)
Stap 4: In het venster “Microsoft Entra Applications” klik je op de
knop “Nieuw”.
-png.png)
Stap 5: In de kaart “Microsoft Entra Application” vul je in:
- Klant-ID – plak het Verarca Azure App-ID: {fcc18624-8bc8-4ce5-b874-cbc111408330}
- Beschrijving (Verarca)
.png)
Stap 6: Vouw “Status” uit en kies “Ingeschakeld”
.png)
Stap 7: Kies “Ja” in de pop-up
-png.png)
Stap 8: Onder “Gebruikersrechten-set” klik je in het
linkerboven veld.
.png)
Stap 9: Klik op de drie puntjes die rechts van het veld verschijnen.
.png)
Stap 10: In het venster “Permission Set Lookup” klik je op de
zoekknop.
-png.png)
Stap 11: Typ in het zoekveld “Bus premium” en klik op de machtiging “D365 BUS PREMIUM”.
-png.png)
Stap 12: Herhaal hetzelfde proces en voeg de machtiging “SUPER (DATA)” toe
Stap 13: Uiteindelijk zou je kaart er zo uit moeten zien:
-png.png)
Stap 14: Je bent klaar, je kunt terugkeren naar de hoofdpagina van
Business Central.

